GitLab - オンプレのLXDにGitLabを立てる
GitLabなどを載せているLXDのホストをDebian(buster)から(bullseye)に引っ越すついでにクリーンインストールした。
インストールのやり方などを調べていて、ミドルやアプリを組み合わせた場合のサンプルがもっとあるといいなと思ったので書く。
そりゃみんなSaaS使うよね、という内容。
できあがりイメージ
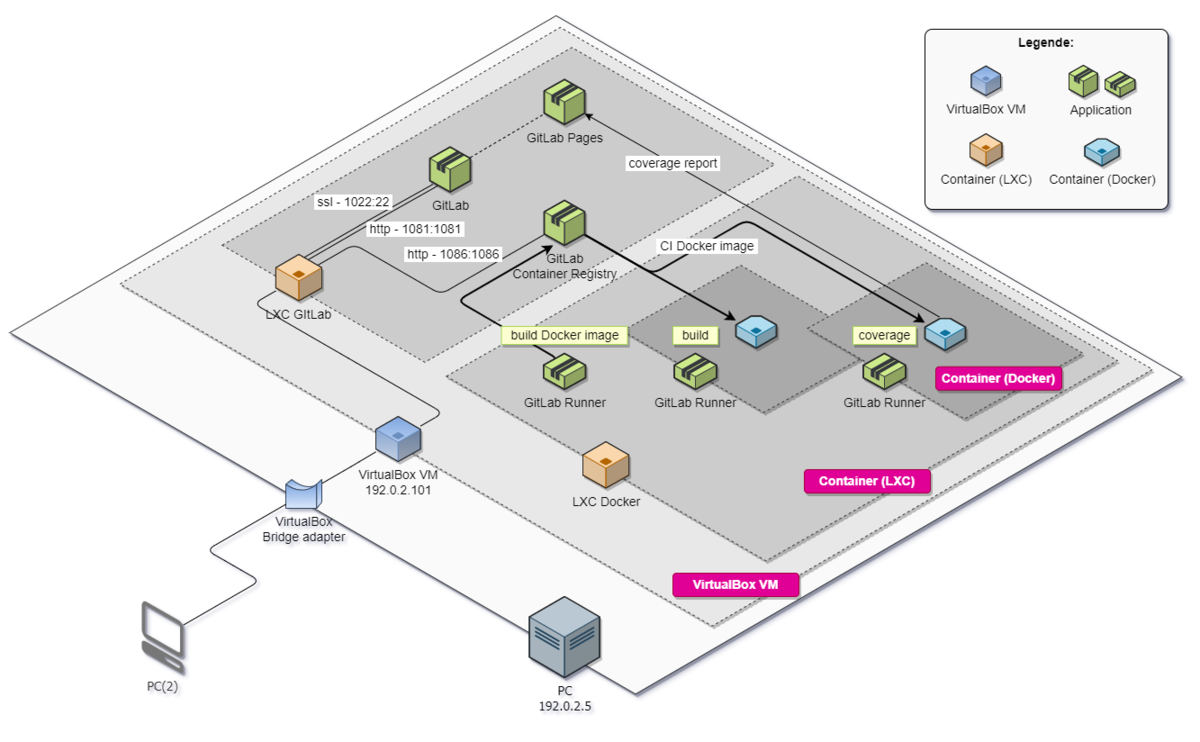
- 物理マシン(Windows)に入れたVirtualBox上でDebianを動かしLXDのホストにする
- LXDでGitLab用とDocker用の2つのコンテナを動かす
- GitLab用コンテナ
GitLab本体の他、Container Registry(CIで使用するDockerイメージ保管用)と、Pages(カバレッジレポート表示用)を動かす。
ただ、Pages周りはヘンテコ運用になってしまった。残念。 - Docker用コンテナ
GitLab Runnerを動かす。
図のGitLab Runnerの構成は以前の記事で使用した際のもの。
- GitLab用コンテナ
- VMはブリッジ接続し、LXDコンテナはポート転送する
I/O激遅になるかもと思ったが、一人で使う分には大丈夫そう。
複数人だとGitLab Runnerを別マシンに移すなりしないと厳しいと思われる。
目安として、GitLabのWebUIはプロジェクトのトップページ(ファイル一覧)の表示が0.9秒くらい。
CIでは、Rustのwarp+mongodbを使ったHello Worldレベルのプロジェクトで、ビルドが1.5分、カバレッジ取得(テスト5ケースほど)が2分くらい。
CI実行中はWebUIの表示も2秒掛かるくらい重くなる。
環境
- VirtualBox: 6.1.34-150636
- Debian: 11.3 bullseye
- LXD: 5.1
- ZFS: 2.1.4-1~bpo11+1
- Gitlab: gitlab-ee 14.10.2 (Omnibus)
- Docker: 20.10.16, build aa7e414
- VMへの割り当てリソース
作る
VirtualBox
VM(ハコ)作成
環境の内容でハコを作る。
OSインストール
Debian 11.3 bullseyeを入れる。
今回の記事で関連しそうな設定は以下の通り。
- Graphical Installを使用 (sudo未インストール)
- ホスト名は
debian1 - ユーザ名は
user1 - ストレージは小さい方(20GB)が
/dev/sdaで、大きい方(50GB)が/dev/sdbになるようにする - aptミラーは
ftp.jp.debian.org - Software selectionは
SSH Serverのみを選択
ツール類インストール
user1@debian1:~$ su -
root@debian1:~# apt update
root@debian1:~# apt install sudo snapd parted
root@debian1:~# usermod -aG sudo user1
- この後、
user1をログインし直せばsudoできるようになっているはず snapdはlxdのインストール用で、partedはZFSのパーティション作成用- 必須ではないが、この他に
vim,bash-completion,ncdu,btop(contrib)を入れた
IPアドレス割り当て
- 静的IP割り当て
VM
/etc/network/interfaces
    :
# The primary network interface
- allow-hotplug enp0s3
- iface enp0s3 inet dhcp
+ auto enp0s3
+ iface enp0s3 inet static
+   address 192.0.2.101
+   netmask 255.255.255.0
+   gateway 192.0.2.1
    :
- サービス再起動
user1@debian1:~$ sudo systemctl restart networking.service
SSH接続設定
サーバコンソールだとコピペできなくてつらいので、早めにssh接続できるようにしておきたい。
まだ鍵を持っていない場合は作る
https://duckduckgo.com/?q=ssh+keygen&df=yクライアント側のssh configに追記
PC
~/.ssh/config
  :
+ # LXD host
+ Host debian1
+   HostName 192.0.2.101
+   PreferredAuthentications publickey
+   IdentityFile ~/.ssh/id_rsa

# ついでにgit cloneとかで使う分も追記しておく
+ # git remote
+ Host 192.0.2.101
+   HostName 192.0.2.101
+   Preferredauthentications publickey
+   IdentityFile ~/.ssh/id_rsa
+   Port 1022
- クライアントマシンからサーバへ鍵を送る
PC
user1@pc1:~$ ssh-copy-id user1@192.0.2.101

# 鍵で接続できるようになったはず
user1@pc1:~$ ssh debian1
エイリアス設定
必須ではないが、やっておくと後々ラク。
user1@debian1:~$ echo -e "\n\nalias ll='ls -Flh'\nalias lk='ls -AFlh'" >> ~/.bashrc
user1@debian1:~$ source ~/.bashrc
ZFS
LXDのストレージバックエンドとしてZFSを使う。
以前は、お試しで入れたディレクトリバックエンドをそのまま使い続けていたが、環境を移行しようとlxc publishしようとしたところ、びっくりするほど遅くて諦めたので、今回はZFSを使うことにした。
インストール
ZFSはcontribコンポーネントにある。
今回はbackportsからインストールする。
# contribとbackportsを追加
user1@debian1:~$ sudo sed -i.original -e 's# main$# main contrib#g' /etc/apt/sources.list
user1@debian1:~$ echo "deb http://ftp.jp.debian.org/debian bullseye-backports main contrib" | sudo tee -a /etc/apt/sources.list
user1@debian1:~$ echo "deb-src http://ftp.jp.debian.org/debian bullseye-backports main contrib" | sudo tee -a /etc/apt/sources.list
user1@debian1:~$ sudo apt update

# ZFSインストール
user1@debian1:~$ sudo apt install linux-headers-amd64
user1@debian1:~$ sudo apt install -t bullseye-backports zfsutils-linux
user1@debian1:~$ sudo modprobe zfs
パーティション作成
/dev/sdbをZFSで初期化する。
user1@debian1:~$ sudo parted /dev/sdb
GNU Parted 3.4
Using /dev/sdb
Welcome to GNU Parted! Type 'help' to view a list of commands.
(parted) p
Error: /dev/sdb: unrecognised disk label
Model: ATA VBOX HARDDISK (scsi)
Disk /dev/sdb: 53.7GB
Sector size (logical/physical): 512B/512B
Partition Table: unknown
Disk Flags:
(parted) mklabel gpt
(parted) mkpart zfs1 zfs 2048s 100%
(parted) p
Model: ATA VBOX HARDDISK (scsi)
Disk /dev/sdb: 53.7GB
Sector size (logical/physical): 512B/512B
Partition Table: gpt
Disk Flags:

Number  Start   End     Size    File system  Name  Flags
 1      1049kB  53.7GB  53.7GB  zfs          zfs1

(parted) q
Information: You may need to update /etc/fstab.
LXD
インストール
snapdで入れる。
Linux Containers - LXD - LXDを使い始めるには
user1@debian1:~$ sudo snap install lxd
user1@debian1:~$ sudo usermod -aG lxd user1
- この後、
user1をログインし直せばlxcコマンドが使えるようになっているはず - Ubuntuと比べて、たまに
lxcコマンドの反応が遅いような……
初期設定
イメージの自動更新はOFFにしておく。
頻繁にコンテナを作るわけではないので、せっかく最新に保ってくれていても回線やストレージI/Oの無駄遣いになってしまう。
user1@debian1:~$ lxd init
Would you like to use LXD clustering? (yes/no) [default=no]:
Do you want to configure a new storage pool? (yes/no) [default=yes]:
Name of the new storage pool [default=default]: zfs_pool1
Name of the storage backend to use (lvm, zfs, ceph, btrfs, dir) [default=zfs]:
Create a new ZFS pool? (yes/no) [default=yes]:
Would you like to use an existing empty block device (e.g. a disk or partition)? (yes/no) [default=no]: yes
Path to the existing block device: /dev/sdb1
Would you like to connect to a MAAS server? (yes/no) [default=no]:
Would you like to create a new local network bridge? (yes/no) [default=yes]:
What should the new bridge be called? [default=lxdbr0]:
What IPv4 address should be used? (CIDR subnet notation, “auto” or “none”) [default=auto]:
What IPv6 address should be used? (CIDR subnet notation, “auto” or “none”) [default=auto]: none
Would you like the LXD server to be available over the network? (yes/no) [default=no]:
Would you like stale cached images to be updated automatically? (yes/no) [default=yes]: no
Would you like a YAML "lxd init" preseed to be printed? (yes/no) [default=no]:
GitLab用コンテナ作成
コンテナ(ハコ)作成
- 作成したコンテナを誤って削除できないようガードを掛ける
Linux Containers - LXD - Advanced guide
Method 1のやり方(プロンプトを出す)だと「アーハイハイ」でEnterしてしまいがちなので、明確なオペレーションが発生するMethod 2のやり方にした。 - VMの外からHttpなどでアクセスできるようにポート転送する
# コンテナ作成
user1@debian1:~$ lxc launch images:debian/bullseye gitlab1

# コンテナの誤削除防止
user1@debian1:~$ lxc config set gitlab1 security.protection.delete=true

# ポート転送
#  - 1081: GitLabのWebUI
#  - 1086: GitLabのContainer Registry
#  - 1022: gitクライアント向けのssh (こっちを22番にした方がいいかも?)
user1@debian1:~$ lxc config device add gitlab1 http1081_gitlab   proxy listen=tcp:0.0.0.0:1081 connect=tcp:127.0.0.1:1081 bind=host
user1@debian1:~$ lxc config device add gitlab1 http1086_registry proxy listen=tcp:0.0.0.0:1086 connect=tcp:127.0.0.1:1086 bind=host
user1@debian1:~$ lxc config device add gitlab1 ssh1022_gitlab    proxy listen=tcp:0.0.0.0:1022 connect=tcp:127.0.0.1:22 bind=host
GitLabインストール
今回はLXD上で運用するため、公式手順とは異なるやり方をした。
また、旧環境からデータを移行する場合は個別の考慮が必要になる。
Download and install GitLab | GitLab
LXDコンテナで動かすためにカーネルパラメータの変更をスキップ
通常の手順ではインストールスクリプト内のreconfigureによってカーネルパラメータが変更されるが、非特権コンテナではエラーになる。
以下のように進めることでこれを回避する。-
apt install時にEXTERNAL_URLを指定しない
指定しなければreconfigureは実行されない。 - GitLabのインストール後、設定ファイルでカーネルパラメータを変更しないよう指定
- 手動で
gitlab-ctl reconfigureを実行
-
旧環境からデータを移行する場合はGitLabのバージョンを旧環境と合わせる
GitLabのバックアップは取得したバージョンと同じバージョンにしかリストアできない。
このため、移行する場合は旧環境を最新バージョンにしておくか、新環境へいったん旧バージョンを入れてリストアしてから最新版へ更新する必要がある。
今回は後者のやり方にした。
Restore GitLab
user1@debian1:~$ lxc exec gitlab1 bash
LXC GitLab
# aptをJPミラーに向けておく
root@gitlab1:~# sed -i.original 's#/deb.debian.org/debian #/ftp.jp.debian.org/debian #g' /etc/apt/sources.list
root@gitlab1:~# apt update
root@gitlab1:~# apt install curl openssh-server ca-certificates perl

# メール配信しないので`postfix`はインストールしない

root@gitlab1:~# curl https://packages.gitlab.com/install/repositories/gitlab/gitlab-ee/script.deb.sh | bash

# - `EXTERNAL_URL`を指定しない
# - 旧環境からデータ移行する場合は旧環境と同じバージョンをインストールする(ここでは仮に14.8.2としておく)
root@gitlab1:~# apt install gitlab-ee=14.8.2-ee.0
設定ファイル編集
GitLabを起動する前に、設定ファイルでエラーの回避指定や起動するサービスの選別などをしておく。
WebUIアクセス用URL指定
通常の手順ではインストール時に指定するEXTERNAL_URL。
LXC GitLab
/etc/gitlab/gitlab.rb
  :
- external_url 'http://gitlab.example.com'
+ external_url 'http://192.0.2.101:1081'
  :
カーネルパラメータ変更のスキップ
gitlab-ctl reconfigure実行時にカーネルパラメータを変更しないようにする。
LXC GitLab
/etc/gitlab/gitlab.rb
  :
##! Attempt to modify kernel paramaters. To skip this in containers where the
##! relevant file system is read-only, set the value to false.
- # package['modify_kernel_parameters'] = true
+ package['modify_kernel_parameters'] = false
  :
(有効化) GitLab Pages
CIのカバレッジレポート表示用。
GitLab Pages administration | GitLab
IP指定だと思い通りにいかなかったので、ここだけ間に合わせのホスト名を割り振り、クライアントPCのhostsにも対応するホスト名を追記してやり過ごすことにした。
LXC GitLab
/etc/gitlab/gitlab.rb
  :
- # pages_external_url "http://pages.example.com/"
- # gitlab_pages['enable'] = false
+ pages_external_url "http://gitlab-pages.test:1081/"
+ gitlab_pages['enable'] = true
  :
実際に生成されるURLでは、pages_external_urlで定義したホストの先頭にプロジェクトが属するグループ名が付加される。
例えば上記の定義であれば、hogeグループに属するfugaプロジェクトのCIでカバレッジレポートを生成した場合、URLの先頭部分は次のようになる。
http://hoge.gitlab-pages.test:1081/-/fuga/ ~
このため、クライアントPCのhostsにもグループ数分のエントリを追加するか、DNSを立てる必要がある。
PC
user1@pc1:~$ echo "192.0.2.101 hoge.gitlab-pages.test" >> /etc/hosts
力及ばずヘンテコな運用になってしまい無念である。
(有効化) GitLab Container Registry
CIでのDockerイメージ格納用。
ポート番号はGitLabのWbUIとは別にしておく。
GitLab Container Registry administration | GitLab
LXC GitLab
/etc/gitlab/gitlab.rb
  :
- # registry_external_url 'https://registry.example.com'
+ registry_external_url 'http://192.0.2.101:1086'
  :
(無効化) Prometheus
メトリクス収集。
欲しい情報はGitLabの基本的な機能で足りているので今回は使わない。
Monitoring GitLab with Prometheus | GitLab
LXC GitLab
/etc/gitlab/gitlab.rb
  :
# To completely disable prometheus, and all of it's exporters, set to false
- # prometheus_monitoring['enable'] = true
+ prometheus_monitoring['enable'] = false
  :
(無効化) Grafana
Prometheusが収集したメトリクスをダッシュボードで視覚化してくれる。
Prometheus同様今回は使わない。
Grafana Dashboard Service | GitLab
LXC GitLab
/etc/gitlab/gitlab.rb
  :
- # grafana['enable'] = true
+ grafana['enable'] = false
  :
(無効化) GitLab agent server for Kubernetes (KAS)
Kubernetesクラスターとの接続を構成・監視する?仕組みらしい。
Kubernetesが分かっていないせいか説明を読んでもサッパリだが、使ってないはずなのでヨシ!
Install the GitLab agent server for Kubernetes (KAS) | GitLab
LXC GitLab
/etc/gitlab/gitlab.rb
  :
##! Enable GitLab KAS
- # gitlab_kas['enable'] = true
+ gitlab_kas['enable'] = false
  :
編集内容を反映
LXC GitLab
# 反映
root@gitlab4:~# gitlab-ctl reconfigure

# WebUIの起動確認 / 起動するまでは`502`
root@gitlab3:~# curl -ILs localhost:1081 | grep HTTP
旧環境のバックアップをリストア
移行しないならこの手順は不要。
Back up and restore GitLab
バックアップ/リストア関連の手順は割と頻繁に変わってそう。
earlier/laterがいっぱいある。
旧環境からバックアップファイルを転送
LXC GitLab
# 旧環境 → GitLabコンテナ
root@gitlab1:~# sftp user1@old_server
sftp> get gitlab_config_1652870735_2022_05_18.tar
sftp> get 1652869171_2022_05_18_14.8.2-ee_gitlab_backup.tar
sftp> bye
リストア
LXC GitLab
# バックアップファイルを所定の場所に配置
root@gitlab1:~# mkdir /etc/gitlab/config_backup/
root@gitlab1:~# mv gitlab_config_1652870735_2022_05_18.tar /etc/gitlab/config_backup/
root@gitlab1:~# mv 1652869171_2022_05_18_14.8.2-ee_gitlab_backup.tar /var/opt/gitlab/backups/
root@gitlab1:~# chown git:git /var/opt/gitlab/backups/1652869171_2022_05_18_14.8.2-ee_gitlab_backup.tar

# サービス停止
root@gitlab1:~# gitlab-ctl stop puma
root@gitlab1:~# gitlab-ctl stop sidekiq

# リストアして再起動
root@gitlab1:~# gitlab-backup restore BACKUP=1652869171_2022_05_18_14.8.2-ee
root@gitlab1:~# gitlab-ctl reconfigure
root@gitlab1:~# gitlab-ctl restart
root@gitlab1:~# gitlab-rake gitlab:check SANITIZE=true

# 何かのチェック
root@gitlab1:~# gitlab-rake gitlab:doctor:secrets
root@gitlab1:~# gitlab-rake gitlab:artifacts:check
root@gitlab1:~# gitlab-rake gitlab:lfs:check
root@gitlab1:~# gitlab-rake gitlab:uploads:check
最新バージョンへ更新
リストアのために古いバージョンのGitLabをインストールしていた場合は、最新バージョンへ更新しておく。
たまにUpgrade pathsに引っ掛かることがある。
LXC GitLab
# 最新版に直接アップグレードできそうか見てみる
root@gitlab1:~# apt update
root@gitlab1:~# apt upgrade -s
Reading package lists... Done
Building dependency tree... Done
Reading state information... Done
Calculating upgrade... Done
The following packages will be upgraded:
  gitlab-ee
1 upgraded, 0 newly installed, 0 to remove and 0 not upgraded.
Inst gitlab-ee [14.8.2-ee.0] (14.10.2-ee.0 gitlab-ee:1/bullseye [amd64])
Conf gitlab-ee (14.10.2-ee.0 gitlab-ee:1/bullseye [amd64])

# Upgrade pathsを見ると、14.8.2からは14.9.0を経由しないと
# 最新版(14.10.2)にできないので、いったん14.9.0に更新する
root@gitlab1:~# apt install gitlab-ee=14.9.0-ee.0

# 14.9.0が入ったら最新版へ
root@gitlab1:~# apt upgrade
Docker用コンテナ作成
コンテナ(ハコ)作成
LXDコンテナ内でDockerコンテナを動かせるよう、コンテナのネストを許可しておく。
# コンテナ作成 / ネストを許可
user1@debian1:~$ lxc launch images:debian/bullseye docker1 -c security.nesting=true

# コンテナの誤削除防止
user1@debian1:~$ lxc config set docker1 security.protection.delete=true
Dockerインストール
公式の手順通りで大丈夫。
Install Docker Engine on Debian | Docker Documentation
user1@debian1:~$ lxc exec docker1 bash
LXC Docker
# aptをJPミラーに向けておく
root@docker1:~# sed -i.original 's#/deb.debian.org/debian #/ftp.jp.debian.org/debian #g' /etc/apt/sources.list

root@docker1:~# apt-get remove docker docker-engine docker.io containerd runc

root@docker1:~# apt-get update
root@docker1:~# apt-get install ca-certificates curl gnupg lsb-release

root@docker1:~# curl -fsSL https://download.docker.com/linux/debian/gpg | sudo gpg --dearmor -o /usr/share/keyrings/docker-archive-keyring.gpg
root@docker1:~# echo "deb [arch=$(dpkg --print-architecture) signed-by=/usr/share/keyrings/docker-archive-keyring.gpg] https://download.docker.com/linux/debian $(lsb_release -cs) stable" | sudo tee /etc/apt/sources.list.d/docker.list > /dev/null
root@docker1:~# apt-get update
root@docker1:~# apt-get install docker-ce docker-ce-cli containerd.io docker-compose-plugin

root@docker1:~# docker run --rm hello-world
GitLab Runnerインストール
GitLabのWebUIでRunnersの編集画面にコマンドが書いてあるのでコピペ。
WebUIへログインするためのパスワードはGitLabの新規ユーザ登録を参照。
Menu > Admin > Overview(サイドメニュー) > Runners > Register an instance runner > Show runner installation and registration instructions
gitlab-runner register指定サンプル:
LXC Docker
root@docker1:~# sudo gitlab-runner register --url http://192.0.2.101:1081/ --registration-token b41a-9VWVPFsjiqv-AJB
Runtime platform                                    arch=amd64 os=linux pid=5329 revision=f761588f version=14.10.1
Running in system-mode.

Enter the GitLab instance URL (for example, https://gitlab.com/):
[http://192.0.2.101:1081/]:
Enter the registration token:
[b41a-9VWVPFsjiqv-AJB]:
Enter a description for the runner:
[docker1]: Example Runner 1
Enter tags for the runner (comma-separated):

Enter optional maintenance note for the runner:

Registering runner... succeeded                     runner=b41a-9VW
Enter an executor: docker-ssh+machine, kubernetes, docker, shell, ssh, virtualbox, custom, docker-ssh, parallels, docker+machine:
docker
Enter the default Docker image (for example, ruby:2.7):
debian:stable-slim
Runner registered successfully. Feel free to start it, but if it's running already the config should be automatically reloaded!
gitlab-runnerユーザをdockerグループに追加
しないとCI実行時にエラー。
dial unix /var/run/docker.sock: connect: permission denied.
LXC Docker
root@dockers:~# usermod -aG docker gitlab-runner
gitlab-runnerユーザの.bash_logoutを無効化
しないとCI実行時にエラー。
ERROR: Job failed: prepare environment: exit status 1. Check https://docs.gitlab.com/runner/shells/index.html#shell-profile-loading for more information
Types of shells supported by GitLab Runner | GitLab
LXC Docker
root@dockers:~# mv /home/gitlab-runner/.bash_logout{,.bk}
コンテナレジストリへのHTTPアクセスを許可
しないとCI実行時にエラー。
Error response from daemon: Get "https://192.0.2.101:1086/v2/": http: server gave HTTP response to HTTPS client
Test an insecure registry | Docker Documentation
LXC Docker
root@docker1:~# echo '{ "insecure-registries" : ["192.0.2.101:1086"] }' >> /etc/docker/daemon.json
root@docker1:~# systemctl restart docker
GitLabの新規ユーザ登録
移行した場合は(たぶん)不要。
インストール直後はユーザがrootしかいないので、rootでWebUIにログインして他のユーザを作る。
rootのパスワードはGitLabをインストールした際に生成されている。
LXC GitLab
/etc/gitlab/initial_root_password
# WARNING: This value is valid only in the following conditions
#          1. If provided manually (either via `GITLAB_ROOT_PASSWORD` environment variable or via `gitlab_rails['initial_root_password']` setting in `gitlab.rb`, it was provided before database was seeded for the first time (usually, the first reconfigure run).
#          2. Password hasn't been changed manually, either via UI or via command line.
#
#          If the password shown here doesn't work, you must reset the admin password following https://docs.gitlab.com/ee/security/reset_user_password.html#reset-your-root-password.

Password: *******************************

# NOTE: This file will be automatically deleted in the first reconfigure run after 24 hours.
メールサーバを立てていない場合、新規ユーザの初期パスワードはどこからも参照できないが、ユーザの編集画面で任意のパスワードにリセットできる。
gitlab signup users without email confirmation - Stack Overflow
これでできあがり。